
How To Connect Excel To MySQL via ODBC

In this article, we’ll explore the step-by-step process of connecting Microsoft Excel to a MySQL database using Open Database Connectivity (ODBC). The focus is to guide you through the intricacies of setting up this integration, making it easier for you to import, analyze, and report data directly within Excel. The integration of Excel with MySQL opens up a plethora of opportunities for data analysis and reporting. It allows you to leverage Excel’s powerful analytical tools on your MySQL data, providing a seamless way to make data-driven decisions. Whether you’re a data analyst looking to create dynamic dashboards or a business professional aiming to derive actionable insights, this guide will equip you with the knowledge you need to connect Excel and MySQL efficiently via ODBC.
Table of Contents
Prerequisites
Before diving into the tutorial, it’s crucial to ensure that you have the following software and tools installed and configured on your system:
- Microsoft Excel: The spreadsheet software where you’ll be importing and analyzing the MySQL data. Ensure you have a version that supports ODBC connectivity.
- MySQL Database: The database that you’ll be connecting to. Make sure it’s installed and that you have the necessary permissions to access it.
- ODBC Administrator: This is a built-in utility in most operating systems that allows you to manage ODBC drivers and data sources. You’ll use it to configure the ODBC driver for MySQL.
- ODBC Driver for MySQL: This driver enables the ODBC connectivity between Excel and MySQL. You can download it from the Devart website.
- Text Editor or IDE (Optional): While not strictly necessary for this tutorial, a text editor like Notepad or an Integrated Development Environment (IDE) can be useful for editing SQL queries or scripts.
- Web Browser: You’ll need a web browser to download the necessary software and possibly consult documentation.
Having these prerequisites in place will ensure a smooth and successful process as you work through the steps to connect Microsoft Excel to a MySQL database via ODBC.
Configuring the ODBC Driver
To establish a successful connection between Microsoft Excel and a MySQL database, you’ll first need to configure the ODBC driver for MySQL. Here’s a detailed guide on how to do it:
Running ODBC Administrator
Accessing ODBC Administrator: Navigate to the Control Panel on your system and search for “ODBC Data Sources” or simply type “ODBC” in the search bar. Click on it to open the ODBC Administrator.
Navigating to System DSN Tab
Switching to ‘System DSN’ Tab: Once the ODBC Administrator is open, locate and click on the ‘System DSN’ tab. This tab allows you to manage data sources that are available system-wide.
Adding a Data Source
Clicking ‘Add’ Button: Within the ‘System DSN’ tab, you’ll find an ‘Add’ button. Click on it to initiate the process of adding a new data source.
Selecting the ODBC Driver
Choosing MySQL ODBC Driver: A list of available ODBC drivers will appear. Scroll through the list and select the ODBC driver for MySQL. This is the driver you previously installed as part of the prerequisites.
Finalizing Selection: After selecting the appropriate driver, click ‘Finish’ or ‘OK’ to finalize your selection and proceed to the next steps of configuration.
By following these steps, you’ve successfully navigated the initial stages of configuring the ODBC driver, setting the foundation for connecting Microsoft Excel to your MySQL database.
Setting Up Connection Information
After configuring the ODBC driver, the next crucial step is to set up the connection information that allows Excel to communicate with your MySQL database. Here’s how:
Filling Out Dialog Box
Entering Connection Details: Once you’ve selected the ODBC driver, a dialog box will appear. This box will have multiple fields, including server name, database name, username, and password. Fill in these fields with the appropriate information to establish the connection.
Testing the Connection
Using ‘Test Connection’ Button: After filling out the dialog box, you’ll notice a ‘Test Connection’ button at the bottom. Click on this button to verify that the settings are correct and that a connection to the MySQL database can be established.
Confirmation Message: If the test is successful, you’ll receive a confirmation message. If not, you’ll need to revisit the settings and correct any errors.
Finalizing Setup
Click ‘OK’ to Save Settings: Once the connection test is successful, click the ‘OK’ button at the bottom of the dialog box. This will save all the settings you’ve entered and finalize the connection setup.
By completing these steps, you’ve successfully set up the connection information between Microsoft Excel and your MySQL database. You’re now ready to proceed with importing data into Excel.
Accessing MySQL Data in Excel
With the ODBC driver and connection information in place, you can leverage Excel’s Get & Transform (Power Query) feature to access MySQL data. This method assumes you’ve already installed an ODBC driver for MySQL. Here’s how to proceed:
Clicking on Data and Expanding Get Data
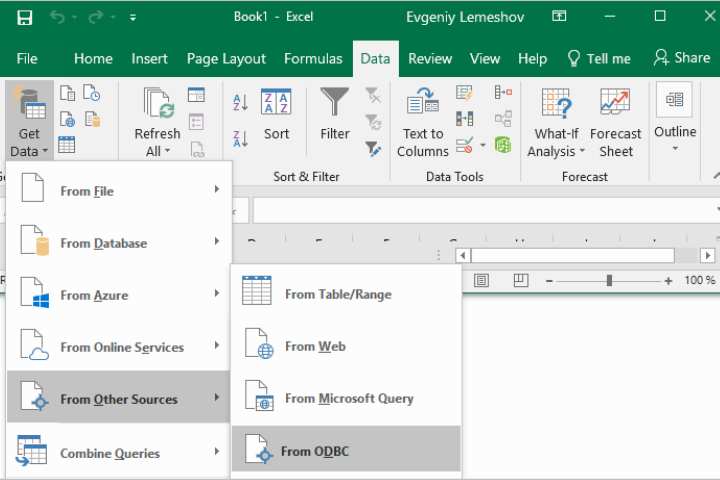
Navigating to ‘Data’ Tab: Open Excel and click on the ‘Data’ tab in the ribbon menu.
Expanding ‘Get Data’: Locate and click on the ‘Get Data’ dropdown menu, then select ‘From Other Sources’ followed by ‘From ODBC.’
Configuring From ODBC Dialog
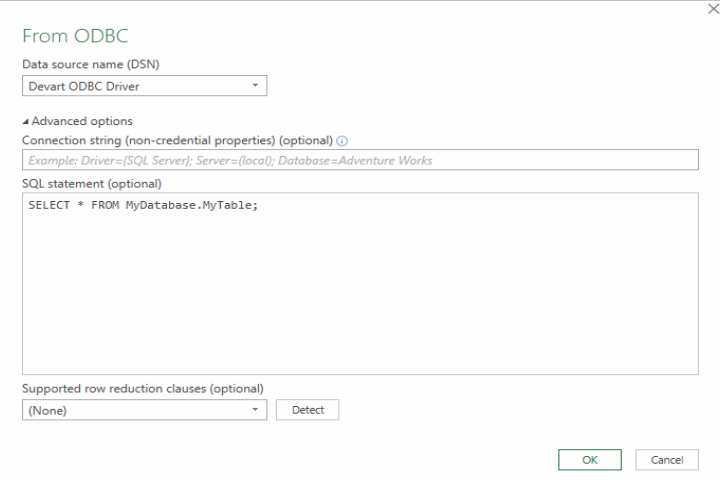
Choosing Data Source Name (DSN): In the ‘From ODBC’ dialog that appears, select your Data Source Name (DSN).
Advanced Options and SQL Statement: If you haven’t configured your ODBC driver yet, you can expand the ‘Advanced Options’ dialog box to manually enter the connection string. Optionally, you can also enter an SQL statement to execute upon connection. Click ‘OK’ to proceed.
Entering Credentials
Database Credentials: If your database requires a username or password, select ‘Database’ and enter your credentials in the dialog box.
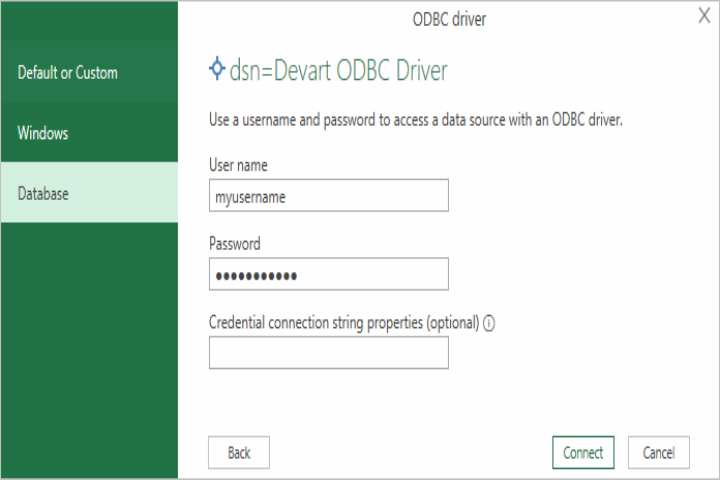
Default or Custom Credentials: If your database is not password-protected or you’ve pre-configured your credentials in the ODBC settings, select ‘Default’ or ‘Custom’ and click ‘Connect.’

Selecting Table and Loading Data
Choosing the Table: A new window will appear listing available tables. Select the table you wish to import data from.
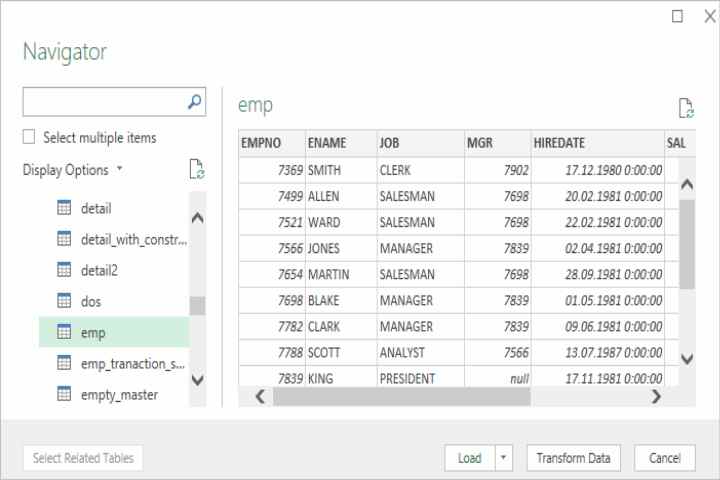
Clicking ‘Load’: After selecting the table, click the ‘Load’ button to populate your Excel spreadsheet with the data.
By following these steps, you’ll be able to access MySQL data in Excel using the Get & Transform (Power Query) feature, providing a robust and flexible way to work with your data.
Retrieving Data into Excel Using Devart ODBC Driver for MySQL
After setting up a connection between MySQL and Excel, you can effortlessly move data to and from both platforms. Below is a guide on how to accomplish this using the Devart ODBC driver for MySQL:
Exporting Data to Excel
- Navigate to Excel’s ‘Data’ Tab: Open Excel and go to the ‘Data’ tab.
- Select ‘From Microsoft Query’: Click ‘From Other Sources’ and choose ‘From Microsoft Query’ from the dropdown.
- Pick Devart ODBC Driver: From the list of available drivers, select ‘Devart ODBC Driver for MySQL’ and hit ‘Connect.’
- Input Connection Information: In the ‘Data Source Configuration Wizard,’ enter essential details like server name, username, and password. Click ‘Test Connection’ to validate the setup.
- Choose Database and Table: After confirming the connection, select the database and table you wish to export.
- Column Selection: In the ‘Microsoft Query’ window, tick the boxes next to the column names you want to include in the export.
- Initiate Data Export: Click the ‘Return Data’ button and opt for the ‘Table’ setting to move the data to Excel.
- Save File Location: Decide where you’d like to save the Excel file and click ‘OK’ to finalize the export.
Importing Data from Excel
- Access Excel’s ‘Data’ Tab: Open Excel and head to the ‘Data’ tab.
- Choose ‘From Microsoft Query’: Click ‘From Other Sources’ and pick ‘From Microsoft Query’ from the dropdown.
- Select Devart ODBC Driver: Choose ‘Devart ODBC Driver for MySQL’ from the list and hit ‘Connect.’
- Provide Connection Details: Fill in the required fields like server name, username, and password in the ‘Data Source Configuration Wizard.’ Validate by clicking ‘Test Connection.’
- Select Target Database and Table: Once connected, pick the database and table where you want to import data.
- Open SQL Editor: In the ‘Microsoft Query’ window, click the ‘SQL’ button to bring up the SQL editor.
- SQL Command for Data Insertion: Input the SQL command for inserting data. For instance, to insert data into a table called ‘customers,’ use:
SQL
INSERT INTO customers (name, email, phone) VALUES (?, ?, ?)
- Note: The question marks are placeholders for the actual Excel data.
- Set Parameters: Click the ‘Parameters’ button and specify the Excel cell references for the data you wish to import, such as A2, B2, C2.
- Execute Import: Click ‘OK’ to save these settings, and then click ‘OK’ again to run the SQL command, completing the data import from Excel to MySQL.
By following this guide, you’ll be able to both export and import data between MySQL and Excel using the Devart ODBC driver.
Conclusion
In summary, connecting Microsoft Excel to a MySQL database via ODBC involves a series of well-defined steps. Starting with the installation of prerequisites like the Devart ODBC driver for MySQL, the process moves through configuring the ODBC driver, setting up the connection information, and finally, retrieving data into Excel. Whether you’re exporting data from MySQL to Excel or importing it the other way around, each step is crucial for a successful data transfer. This integration offers a powerful way to bring together the analytical capabilities of Excel with the robustness of MySQL databases. I encourage you to leverage this seamless integration to elevate your data analysis and reporting tasks. By doing so, you’ll be well-equipped to make more informed, data-driven decisions that can positively impact your projects or business.